Many people constantly search for natural, effective solutions to transform their dull locks into thick, shimmering tresses. Consequently, herbal remedies have experienced a massive resurgence in popularity among beauty enthusiasts who reject harsh synthetic chemicals. This aromatic herb provides incredible nourishment directly to your scalp and strengthens the delicate strands from root to tip. Therefore, learning how to make rosemary water for hair represents a fantastic, budget-friendly step toward achieving your ultimate wellness goals. You will easily master this traditional botanical recipe and elevate your daily self-care routine in the sections below.
The Botanical Science Behind the Herb
Stimulating Scalp Circulation Effectively
Rosemary contains powerful active compounds like carnosic acid that actively heal and rejuvenate damaged tissue on the cellular level. Furthermore, these natural chemical components stimulate peripheral blood circulation throughout the scalp surface with every single application. This increased blood flow delivers vital oxygen and essential nutrients directly to the dormant hair follicles. As a result, your roots receive the necessary fuel to produce stronger, thicker strands over time. You will notice significantly less shedding and healthier overall development within a few short months.
Combating Oxidative Stress and Inflammation
The environment constantly bombards our tresses with harmful free radicals, intense UV rays, and heavy urban pollution. Fortunately, this remarkable herbal infusion boasts immense antioxidant properties that neutralize these invisible daily threats quite effortlessly. It also fights off stubborn scalp inflammation and harmful fungal populations that trigger frustrating dandruff flakes. By maintaining a clean, balanced microbial environment, you create the absolute perfect foundation for optimal strand longevity. Therefore, this simple water spray serves as an excellent protective shield for your delicate crown.
+-------------------+------------------------------------------+
| Active Compound   | Primary Benefit for Scalp Health         |
|-------------------|------------------------------------------|
| Carnosic Acid     | Heals tissue and stimulates follicles    |
| Rosmarinic Acid   | Reduces inflammation and calms dandruff  |
| Antioxidants      | Neutralizes environmental free radicals  |
+-------------------+------------------------------------------+
Selecting Your Raw Ingredients Wisely
Fresh Versus Dried Herb Leaves
You can easily utilize either fresh sprigs from the garden or high-quality dried leaves from the grocery store pantry. For instance, fresh rosemary contains higher concentrations of volatile essential oils that give the brew its potent aroma. On the other hand, dried leaves offer a much longer shelf life and provide excellent convenience for busy individuals. Both options yield fantastic results, so you should simply choose the material that fits your lifestyle best. Just ensure that you source organic herbs to avoid introducing unwanted pesticides onto your clean scalp.
Choosing the Ideal Water Base
The quality of your brewing liquid matters immensely because standard tap water often contains harsh minerals and chlorine. These chemical additives can inadvertently strip away your natural oils and counteract the beneficial properties of the herb. Consequently, you should always choose distilled, purified, or filtered water for your homemade cosmetic preparations. This clean base allows the botanical compounds to dissolve fully without any negative interference from external contaminants. Ultimately, pure water guarantees a highly stable, effective, and safe rinse for your regular cosmetic use.
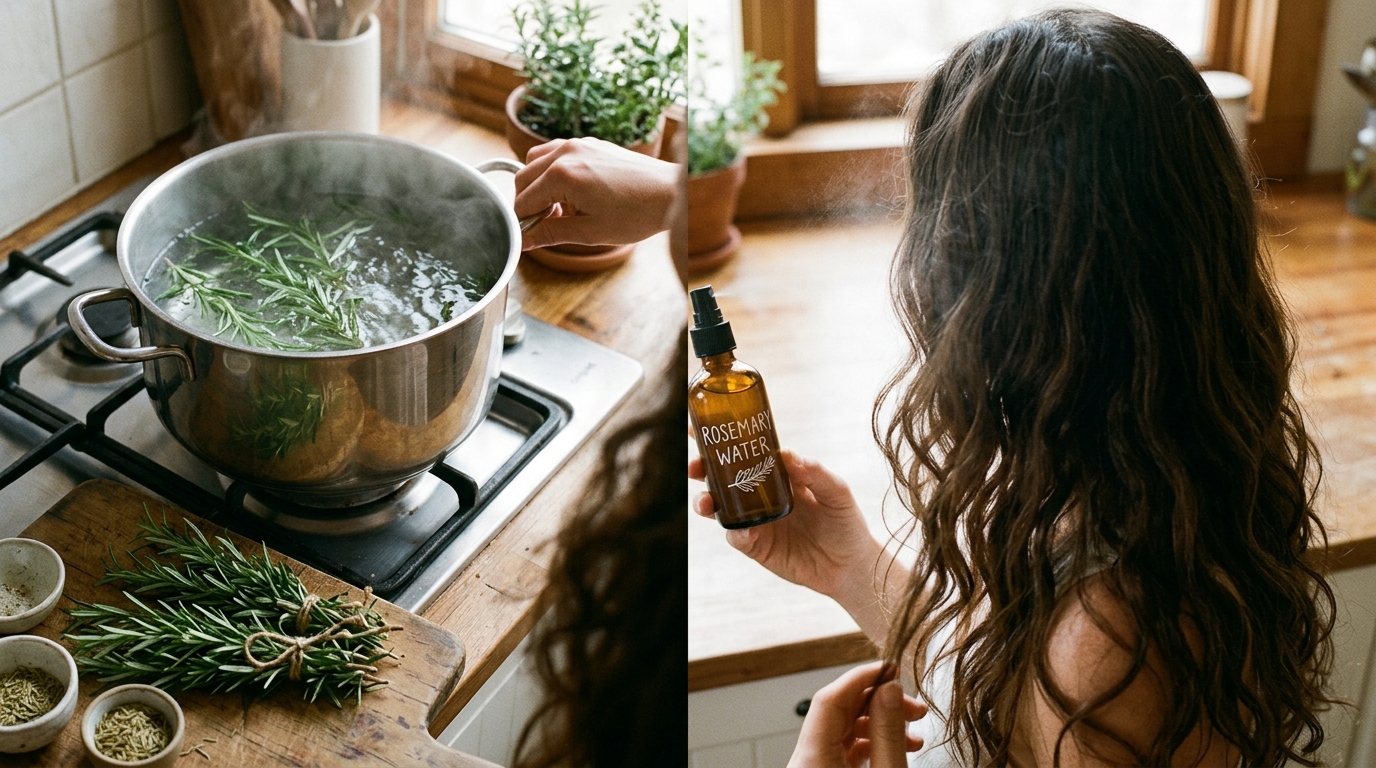
The Step-by-Step Stovetop Brewing Method
Preparing the Perfect Proportions
To begin, measure exactly two cups of distilled water and pour the liquid into a clean stainless steel pot. Next, gather about four or five fresh rosemary sprigs and rinse them thoroughly under cool tap water. If you choose the dried alternative, two tablespoons of the loose herb will suffice perfectly for this recipe size. Place the clean herbs directly into the pot, ensuring the water covers the leaves completely before heating. This precise ratio creates a wonderfully balanced infusion that delivers optimal potency without causing any skin irritation.
The Gentle Simmering Process
Place the pot on your kitchen stove and bring the mixture to a rolling boil over medium-high heat. As soon as the water boils, cover the pot tightly with a lid to trap the escaping steam. Reduce the heat to low and let the herbal mixture simmer gently for approximately fifteen to twenty minutes. This covered simmering process ensures that the valuable volatile oils do not evaporate into the kitchen air. Consequently, the liquid will gradually transform into a rich, dark amber color with a wonderful herbal fragrance.
“Covering the pot during the boiling stage remains absolutely critical because it preserves the therapeutic essential oils within the liquid mixture.” — Herbal Beauty Journal
Cooling, Straining, and Storing Your Brew
The Crucial Cooling Period
Remove the pot from the hot stove burner but leave the lid on for at least one hour. This extended resting period allows the water to absorb the remaining nutrients from the plant matter completely. Furthermore, applying hot liquid directly to your head can cause painful burns or severely damage fragile roots. Let the amber liquid cool down to room temperature naturally before you proceed to the next step. Patience during this cooling phase guarantees a perfectly safe and incredibly comfortable application experience later on.
Proper Filtration and Bottle Selection
Pour the cooled liquid through a fine-mesh strainer into a clean glass measuring cup to remove all leaves. Afterward, transfer the clear herbal infusion carefully into a dark amber glass spray bottle using a small kitchen funnel. The dark glass blocks harmful sunlight rays that would otherwise degrade the delicate organic compounds over time. Store your fresh homemade batch inside the refrigerator immediately to preserve its freshness for up to two weeks. Discard the mixture immediately if you notice any changes in its color or distinct aroma.
Masterful Application Techniques for Maximum Results
The Daily Leave-In Spray Method
Using a spray bottle represents the easiest and most convenient way to integrate this natural rinse into your life. Mist the herbal water generously directly onto your roots every morning or evening before you brush your hair. Part your hair into small, manageable sections to guarantee complete coverage across your entire scalp area. Fortunately, this lightweight fluid does not leave any greasy residue or alter your favorite styling results. Therefore, you can safely apply it to both dry and damp strands without any hesitation.
The Luxurious Post-Wash Nourishing Rinse
Alternatively, you can utilize this aromatic preparation as a magnificent final rinse at the very end of your shower. After you finish shampooing and conditioning your strands normally, pour a generous cup of the fluid over your head. Massage the cool liquid deeply into your skin using your fingertips for three minutes to boost absorption. Do not rinse the herbal water out with tap water afterward; simply towel dry your hair gently. This traditional method seals the cuticle layer beautifully, providing an instant boost in natural shine and manageability.
Advanced Enhancements for Customized Hair Care
Adding Refreshing Mint Leaves
You can easily customize your homemade botanical spray by introducing other beneficial herbs into the original boiling pot. For example, fresh peppermint leaves complement rosemary beautifully because mint contains high amounts of cooling, stimulating menthol. This combination delivers an incredibly refreshing tingle that awakens tired follicles and banishes stubborn itchiness almost instantly. Furthermore, the combination of these two scents creates an absolutely delightful fragrance that rivals expensive luxury spa products. This simple addition upgrades your basic routine into a truly therapeutic sensory experience.
Incorporating Nourishing Essential Oils
If you struggle with extreme dryness, consider adding a few drops of organic jojoba or argan oil to your mix. These lightweight carrier oils lock in essential moisture and smooth down frizzy hair cuticles along the shaft. However, you must shake the spray bottle vigorously before every single use because oil and water separate naturally. You can also introduce two drops of lavender essential oil to promote deep relaxation and soothe sensitive skin. These customizable upgrades allow you to address your specific texture concerns with absolute precision.
Crucial Safety Guidelines and Expectations
Conducting a Mandatory Patch Test
Natural plant remedies provide incredible benefits, but they can still trigger unexpected allergic reactions in sensitive individuals. Therefore, you must perform a quick patch test before spraying the herbal fluid over your entire head. Apply a small drop of the fresh brew to the inside of your elbow or wrist. Monitor the skin closely for twenty-four hours to check for any signs of redness, itching, or irritation. If your skin remains perfectly clear, you can safely enjoy the wonderful benefits of this botanical rinse.
Managing Your Personal Expectations
Consistency represents the absolute golden key when utilizing any form of natural herbal treatment on your body. You will not wake up with a magnificent mane of long, flowing locks after just one single application. Most individuals begin to observe noticeable improvements in thickness and shine after four to six weeks of daily use. Embrace the slow, beautiful process of natural healing and stay dedicated to your chosen wellness routine. Ultimately, your patience will reward you with stronger, more resilient tresses that radiate health from within.
Long-Term Maintenance and Scalp Hygiene
Avoiding Product Buildup
While this herbal spray feels incredibly light, you must still maintain an excellent clarifying routine to prevent buildup. Wash your scalp thoroughly twice a week with a gentle, sulfate-free shampoo to remove residual botanical extracts. Accumulations of any product can clog sensitive pores and inadvertently hinder the growth of new strands over time. You might also consider using a silicone scalp massaging brush during your weekly shampoo sessions. This deep cleaning practice keeps your skin perfectly receptive to the nourishing benefits of your daily herbal spray.
Adjusting Your Routine Seasonally
Our scalps react differently to shifting weather conditions, so you should adapt your herbal application schedule accordingly. During the hot, humid summer months, the astringent properties of the herb help control excess sebum production perfectly. Conversely, you may want to decrease usage slightly during the dry winter if your skin feels uncomfortably tight. Listen closely to the subtle signals of your body and fine-tune your routine to maximize comfort. This mindful approach ensures that your tresses remain perfectly balanced, hydrated, and vibrant all year round.
Conclusion: Embracing the Power of Nature
Rejuvenating your precious locks does not require expensive salon appointments or complicated chemical formulas filled with toxins. By learning how to create this simple botanical wash, you unlock the magnificent restorative secrets of nature. Basic kitchen tools and fresh garden herbs allow you to craft a premium tonic that outperforms commercial alternatives. Commit to this beautiful, aromatic self-care ritual and watch your strands flourish with newfound strength and vitality. Treat your crown with the gentle respect it deserves, and enjoy the radiant journey toward healthier hair.